Inspect the Part As It Grows
The 2016 IAMA was awarded for a technology that monitors thermal radiation to map the internal consistency of a metal part as it is being made. The technology might point the way to an entirely new paradigm for inspection.
Additive manufacturing does not consist of just growing a part’s geometry, as intricate as that geometry might be. Instead, AM also consists of growing that part’s material—its solid form—at the same time that this geometry is made. In fact, what makes additive manufacturing so different from other approaches to production is not the adding instead of subtracting, but instead the laying down of material within the same process that also makes the shape. This is a significant departure from the traditional practice of creating metal and shaping metal within two different processes in two different facilities. Such a departure will affect the way we validate production parts made through AM, and it will affect the means and the standards we use to certify those parts as acceptable.
One company that has thought a lot about this is additive manufacturing machine supplier Concept Laser. This year, the company won the International Additive Manufacturing Award (IAMA) not for its technology in making parts, but for its related technology in inspecting those parts as they are made. “QM Meltpool 3D” is the company’s brand name for a system that uses the thermal radiation from the melting of the metal to generate a detailed image set of the internal formation of the part. The output this system generates is comparable to a computed tomography (CT) scan of the part, even though CT measures a finished part while the Concept Laser system captures data as the part is taking shape. Recently, I had the chance to speak with Concept Laser’s U.S. president and CEO John Murray about the promise of this technology.
The technology is safe, he says. This is one of the points he takes care to stress, and it’s an important one. Monitoring an additive build as it is underway sometimes involves adding sensing devices to the build chamber, but the approach Concept Laser has found does not require this. As a result, the company’s monitoring system has won certification to ATEX, the European directive related to explosive atmospheres, which restricts the use of electromagnetic devices inside the sealed chamber. Thanks to a semi-permeable mirror, QM Meltpool 3D’s sensing is entirely outside the chamber. Thermal radiation passes through the mirror, while radiation at the wavelength of a laser does not. That means the laser can get out of the line of sight of the system’s thermal sensing, bouncing its beam off the mirror to melt the metal while a photodiode and a high-speed camera look through the mirror to observe the result.
What the photodiode and camera are specifically monitoring is the heat exposure of each area of the part touched by the laser, capturing this stream of data in small area increments (pixels). The heat exposure is an indicator of the thoroughness of the metal’s melting, and this in turn is an indicator of the homogeneity of the additively manufactured part. The correlation from heat exposure to material consistency is so strong that comparisons with CT scans of the finished part have shown that this effect accurately predicts even tiny defects within an otherwise solid metal form.
How It Works
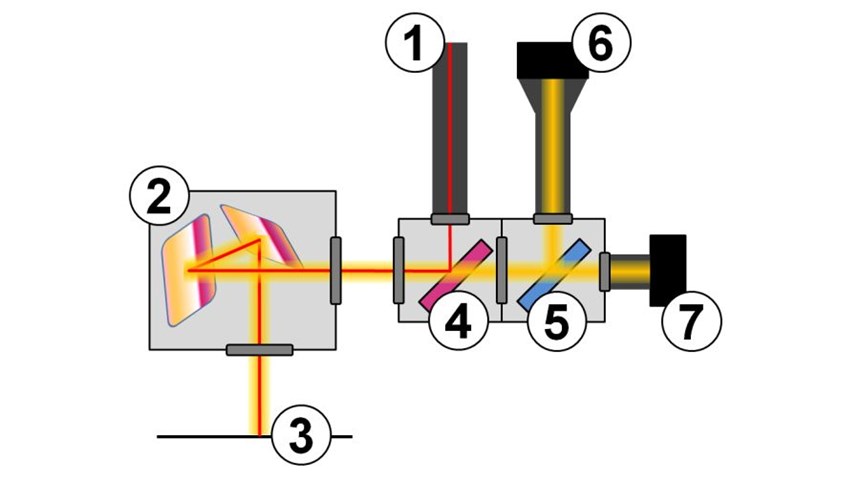
In its IAMA application, Concept Laser described the operation of the system. (I was one of the 10 judges reviewing these applications.) Figure 2, above, shows the major components of the system, and what follows is a paraphrase of Concept Laser’s description. Measuring the part’s formation is part of the same process that achieves that formation, and that process begins with the laser.
The beam first goes to the semi-permeable mirror. The mirror reflects the laser to a galvanometer scanner that positions the beam on the bed of powder metal. The powder absorbs the energy of this beam—melting as a result of the absorption—and as it does so, its emitted thermal radiation passes back through the galvanometer to return along the path of the laser. At the semi-permeable mirror, this radiation passes through, to be twinned by a beamsplitter so it can be directed to both a high-speed camera and the photodiode.
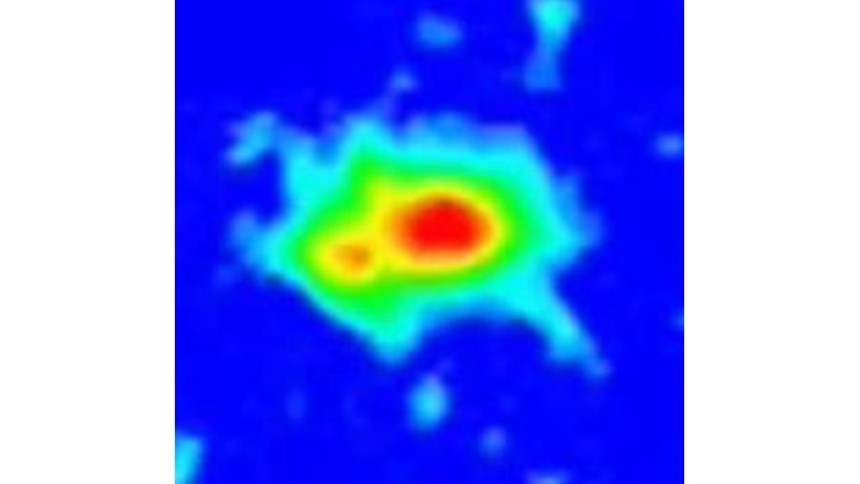
A single frame from the camera is seen in Figure 3. This frame is 100 by 100 pixels, with each pixel 10 microns wide. The spot in the midst of the bright flash in this image is a melt pool about 200 microns wide. Emitted radiation is less within this spot than throughout the brighter corona around it, because energy is being consumed by the melting. The camera captures 15,000 frames like this one per second while a control board captures position information at the same rate. QM Meltpool 3D software then paints the emission data in grayscale values (zero emission = black) at corresponding location coordinates to create complete, detailed images of the inner form of each layer of the part. These images can be studied individually, or they can be viewed in sequence to watch the part’s progression—and the progression of any anomalies—throughout the additive cycle.
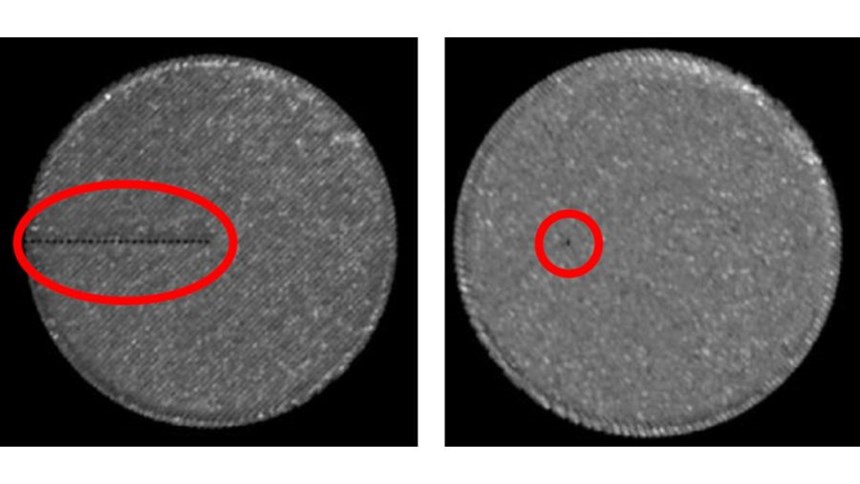
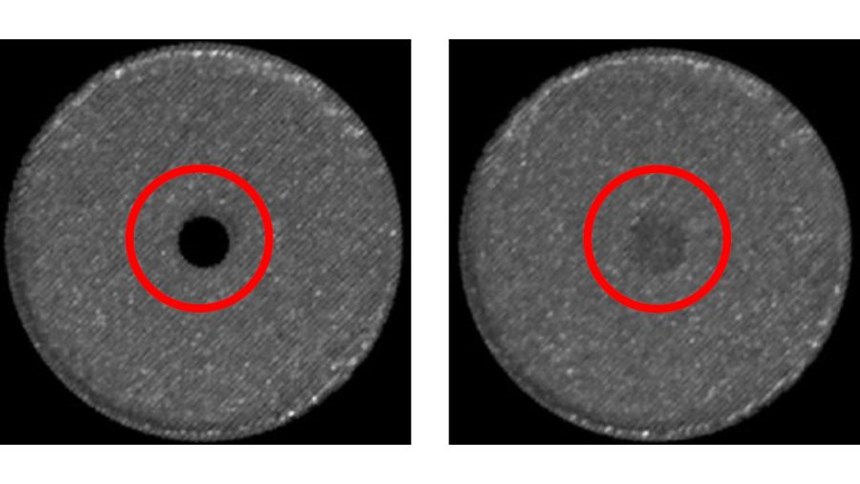
Images from the additive builds of two circular parts (Figure 4) illustrate the discontinuities this system is able to detect (or predict, since the part wasn’t yet finished when the images were taken). In one part, a cylindrical volume as long as the radius of the part, but only 100 microns in diameter, was deliberately left open in the part’s design. In the other part, a 200-micron-diameter sphere was left open. As the two images show, both of these “defects” were accurately captured as they were being formed within the part.
Comparison to CT
Mr. Murray says the CT scan is the right reference to use to determine the effectiveness of meltpool monitoring as a validation tool. If CT is an acceptable non-destructive means of determining a part’s internal integrity (and many manufacturers deem that it is), then meltpool monitoring ought to be acceptable as well—provided that it reliably gives results that match computed tomography imaging.
Concept Laser’s system has strengths and shortcomings relative to CT, he says. In terms of precision, CT excels, offering a resolution of 10 microns versus about 35 microns for QM Meltpool 3D. However, the effectiveness of CT is limited by the density of the material. Meltpool monitoring has no such limitation. Internal maps of dense Inconel, for example, can be generated just as easily as those of any other metal.
Meanwhile, meltpool monitoring has essentially no operational cost. It runs during the additive cycle, and it requires no stand-alone machine.
Concept Laser has demonstrated to its own satisfaction the reliability of its meltpool monitoring at predicting the very same internal effects that computed tomography also reveals. Something like this same comparison is what manufacturers of high-value parts will need to conduct to demonstrate for themselves the effectiveness of such a system. Those taking this step will discover a new means of understanding the part, and perhaps they’ll also discover a different way of thinking about inspection. If meltpool monitoring can indeed perform as effectively as CT, then in theory the inspection of a part can begin even before the part is finished.
There are challenges to this idea, Mr. Murray says. Data storage is one. Manufacturers required to maintain records for traceability would need systems to maintain the enormous amount of data (exabytes, potentially) that ongoing production of critical parts would generate. But then again, for additive manufacturing today, traceability sometimes entails storying test coupons from each build, so merely storing data might be cheap by comparison.
The larger challenge relates to acceptance, he says. The U.S. Food and Drug Administration—the certifying body for medical implants made additively—is aware of the possibility of mapping a part through the Concept Laser system. However, “FDA representatives have told me they don’t yet know what to do with data such as this,” he says. The meltpool map does not fit what is currently seen as acceptable for certifying a part. In regulated industries such as medical manufacturing, meltpool monitoring cannot work as an inspection method (at least not final inspection) until the paradigm changes to allow it.
Presumably, though, that change will come—because other, comparable changes in thinking related to additive manufacturing are already taking hold. For example, it is becoming understood that realizing the full promise of AM will also entail new ways of thinking about component design. Perhaps it is just as true that realizing the promise of AM will entail new ways of thinking about how to validate the part’s quality.
Related Content
3D Printing Molds With Metal Paste: The Mantle Process Explained (Video)
Metal paste is the starting point for a process using 3D printing, CNC shaping and sintering to deliver precise H13 or P20 steel tooling for plastics injection molding. Peter Zelinski talks through the steps of the process in this video filmed with Mantle equipment.
Read MoreAM 101: What Is Binder Jetting? (Includes Video)
Binder jetting requires no support structures, is accurate and repeatable, and is said to eliminate dimensional distortion problems common in some high-heat 3D technologies. Here is a look at how binder jetting works and its benefits for additive manufacturing.
Read MoreHow Norsk Titanium Is Scaling Up AM Production — and Employment — in New York State
New opportunities for part production via the company’s forging-like additive process are coming from the aerospace industry as well as a different sector, the semiconductor industry.
Read MorePossibilities From Electroplating 3D Printed Plastic Parts
Adding layers of nickel or copper to 3D printed polymer can impart desired properties such as electrical conductivity, EMI shielding, abrasion resistance and improved strength — approaching and even exceeding 3D printed metal, according to RePliForm.
Read MoreRead Next
Verifying Structural Integrity of Metal 3D-Printed Parts
X-ray computed tomography, or micro CT, offers insight into the inside of AM parts.
Read MoreValidating and Qualifying
X-ray technology can validate the internal geometry of additively-manufactured parts in 3D without destroying the part.
Read More3D Printed Polymer EOAT Increases Safety of Cobots
Contract manufacturer Anubis 3D applies polymer 3D printing processes to manufacture cobot tooling that is lightweight, smooth and safer for human interaction.
Read More

