Phase3D’s True Layer Thickness Measurement Certifies Uniform Distribution for Every Layer of the Build
The True Layer Thickness tool kit provides objective measurement data to inspect every build in real time.
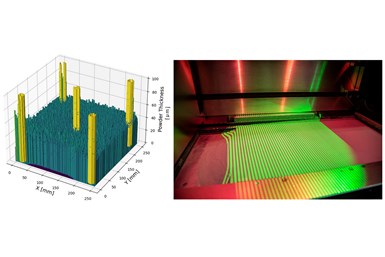
True Layer Thickness records the uniformity and amount of powder distributed across the build area. The data, visualized in 3D (left) is created using Fringe structured light in-situ monitoring system (right). Source:
Phase3D, a Chicago-based company commercializing in-situ monitoring for additive manufacturing (AM) has developed the True Layer Thickness. It is a tool kit that measures the quantity in microns of metal powder spread across the build area, certifying uniform distribution for every layer of every build.
The company says this innovation sets a new standard in inspection for metal powder bed fusion (PBF), providing a new in-situ monitoring tool kit for production-scale AM.
Regulated industry like aerospace, medical and energy seeks to advance AM to meet critical-use applications through in-situ monitoring to reach born-certified parts. Phase3D says it has worked with a prominent aerospace company to develop the True Layer Thickness tool kit, addressing a critical need to ensure high-quality part production.
One key aspect of the True Layer Thickness measurement is objective data. True Layer Thickness uses patented Fringe in-situ monitoring technology to create quantifiable measurements in microns of how much powder is spread during the metal PBF process.
The system also offers precision and consistency. The company says this tool kit ensures precise inspection of the amount of deposited metal powder for every layer of every build. It also offers industrial solutions because it is tailored to the challenges of industrial manufacturing. The system addresses the requirements for industrial applications beyond aerospace, including defense, energy, medical and more.
True Layer Thickness measurement also features seamless integration. The system integrates seamlessly with Phase3D’s existing Fringe in-situ monitoring system, can be added to most metal AM machines to support product development to production.
“We are pleased to introduce True Layer Thickness,” says Dr. Niall O’Dowd, CEO and founder of Phase3D. “This new tool kit underscores our commitment to advancing AM for the benefit of widespread adoption of the technology for critical use applications.”
The company says the True Layer Thickness tool kit is a big step forward for the AM industry to reach born-certified production. Fringe in-situ monitoring and True Layer Thickness provide objective measurement data to inspect every build in real time.
Related Content
-
Renishaw and Plastometrex Collaborate to Increase Precision, Efficiency of AM Mechanical Property Analysis
Plastometrex’s PLX-Benchtop facilitates rapid, direct testing on different sections of additively manufactured parts, delivering comprehensive stress-strain curves in minutes to provide a more precise evaluation of a part’s mechanical properties.
-
Q.ANT’s Compact Quantum Sensor Analyzes Particles for Improved Quality Control in Additive Manufacturing
The particle sensor measures the size, speed and trajectory of particles in liquids and gases.
-
Profilometry-Based Indentation Plastometry (PIP) as an Alternative to Standard Tensile Testing
UK-based Plastometrex offers a benchtop testing device utilizing PIP to quickly and easily analyze the yield strength, tensile strength and uniform elongation of samples and even printed parts. The solution is particularly useful for additive manufacturing.


