Inspection Method to Increase Confidence in Laser Powder Bed Fusion
Researchers developed a machine learning framework for identifying flaws in 3D printed products using sensor data gathered simultaneously with production, saving time and money while maintaining comparable accuracy to traditional post-inspection. The approach, developed in partnership with aerospace and defense company RTX, utilizes a machine learning algorithm trained on CT scans to identify flaws in printed products.
Researchers at the Department of Energy’s Oak Ridge National Laboratory (ORNL) have improved flaw detection to increase confidence in metal parts that are 3D printed using laser powder bed fusion (LPBF). This type of additive manufacturing (AM) offers the energy, aerospace, nuclear and defense industries the ability to create highly specialized parts with complex shapes from a broad range of materials.
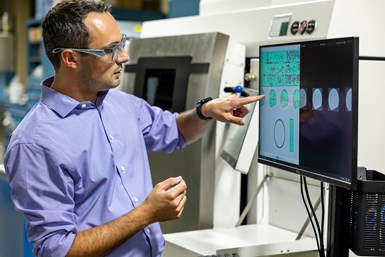
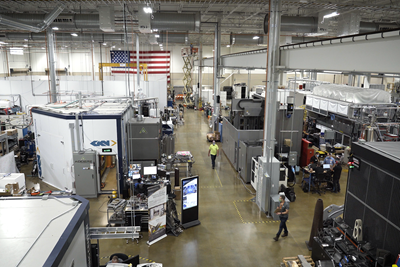
ORNL researcher Zackary Snow compares data from different types of images collected during and after metal parts were additively manufactured using a laser powder bed fusion printer like the one behind him. Photo Credit: Carlos Jones/ORNL, U.S. Dept. of Energy
This technology is not widely utilized because it’s challenging to check the product thoroughly and accurately; conventional inspection methods don’t always find flaws embedded deep in the layers of a printed part.
ORNL researchers developed a method that combines inspection of the printed part after it’s built with information collected from sensors during the printing process. The combined data then teaches a machine learning algorithm to identify flaws in the product. More importantly, this framework allows operators to know the probability of accurate flaw detection just as reliably as traditional evaluation methods demanding more time and labor.
“We can detect flaw sizes of about half a millimeter — about the thickness of a business card —90 percent of the time,” says Luke Scime, an ORNL researcher.
“We’re the first to put a number value on the level of confidence possible for in situ flaw detection,” Scime says. By extension, that reflects confidence in both the product’s safety and reliability.
The Challenge
Laser powder bed fusion, the most common metal 3D printing process, uses a high-energy laser to selectively melt metal powder that has been spread across a build plate. Then, the build plate lowers before the system spreads and melts another layer, slowly building up the designed product.
Engineers know there will be flaws in the material.
“For regular manufacturing we know what those [flaws] are as well as where and how to find them,” says Zackary Snow, an ORNL researcher. “[Operators] know the probability of detecting flaws of a certain size, and therefore know how often to inspect to get a representative sample.”
But 3D printing has not benefited from the same confidence.
“Not having a number makes it hard to qualify and certify parts. It’s one of the biggest hurdles in additive manufacturing,” Snow says.
The Solution
A paper by ORNL researchers and partner RTX, recently published in Additive Manufacturing, explains the process they developed to arrive at a 90 percent detection rate while reducing the probability of false positives, which can lead to the scrapping of otherwise good products.
In the beginning phase of research, aerospace and defense company, RTX designed a part similar to one it already produces, providing opportunities to visualize common, realistic flaws. Then, RTX 3D printed the part multiple times, monitoring each one during the build process with a standard near- infrared camera and an additional visible light camera. Both RTX and ORNL researchers conducted quality inspections afterward using X-ray computed tomography (CT) scans.
In consultation with RTX, ORNL additive manufacturing experts aligned the data into a layered stack of images, which essentially became the textbook for the machine learning algorithm. During training, the algorithm took a first pass at labeling flaws using the CT scan images. Then, a human operator annotated the rest based on visual cues in the data collected during the printing process. Human feedback continues to train the software, so that the algorithm recognizes flaws more accurately each time.
Previous ORNL advances in situ monitoring and deep-learning frameworks were used as tools in this approach. Over time, this will reduce the need for human involvement in the manufacturing inspection process.
“This allows CT-level confidence without the actual CT,” Snow says. A common method for checking 3D printed parts, CT imaging and analysis drives up costs because it requires extra time and expertise. Additionally, CT scanning cannot effectively penetrate dense metals, further limiting its application.
“When the algorithm is applied to a single design, consistently manufactured with the same material and process, it can learn to provide reliable quality analysis within days,” Scime says. At the same time, the software incorporates all that it learns from different designs and constructions, so it will eventually be able to accurately check products with unfamiliar designs.
Benefits of Machine Learning Algorithm for Part Inspection
“This ORNL developed inspection framework could help in expanding additive manufacturing applications. With statistically verified quality control, AM could become viable for mass producing products such as car parts,” Snow says .
“The algorithm could also diversify the types of parts that can be 3D printed. Certainty regarding even the smallest detectable flaw size allows for more design freedom. This is important because the industry is already headed toward larger print volumes and faster print rates — meaning more lasers interacting to create bigger parts with different types of flaws,” says Brian Fisher, the senior principal engineer for additive manufacturing at RTX’s Raytheon Technologies Research Center.
“You can really start to save time and money and make a business case when printing larger assemblies — however these are also the hardest to inspect today. The vision with additive is that we can make large, highly complex parts in very dense materials, which traditionally would be very difficult and expensive to thoroughly inspect,” Fisher says.
In the continuation of this research, the ORNL team will train the deep-learning algorithm to better differentiate between types of irregularities and to categorize flaws that have multiple causes.
The ability to quantify this level of confidence during the printing process is new and enables manufacturers to vouch for a product’s safety and reliability when it is created with the most common metal 3D printing process.
Additional Resources
Additional ORNL researchers who contributed to the project include Amir Ziabari and Vincent Paquit. The research was sponsored by DOE’s Advanced Materials and Manufacturing Technologies Office (AMMTO), with support from RTX. The research took place at DOE’s Manufacturing Demonstration Facility at ORNL.
UT-Battelle manages ORNL for the Department of Energy’s Office of Science, the single largest supporter of basic research in the physical sciences in the United States. The Office of Science is working to address some of the most pressing challenges of our time. For more information, please visit energy.gov/science.
Related Content
Renishaw and Plastometrex Collaborate to Increase Precision, Efficiency of AM Mechanical Property Analysis
Plastometrex’s PLX-Benchtop facilitates rapid, direct testing on different sections of additively manufactured parts, delivering comprehensive stress-strain curves in minutes to provide a more precise evaluation of a part’s mechanical properties.
Read MoreVideo: Scanning for Fast Model Capture and Validation of AM Parts
3D printing offers a fast way to obtain a part. Can developing the printable file and validating the printed part be done rapidly as well? See fast measurement technology for complex 3D forms I found at IMTS.
Read MoreProfilometry-Based Indentation Plastometry (PIP) as an Alternative to Standard Tensile Testing
UK-based Plastometrex offers a benchtop testing device utilizing PIP to quickly and easily analyze the yield strength, tensile strength and uniform elongation of samples and even printed parts. The solution is particularly useful for additive manufacturing.
Read MoreDimensionics Density Offers Automated Density Determination for AM-Produced Parts
Formnext 2023: Dimensionics Density’s automatic density determination technology provides automated, accurate and repeatable density determinations for additive manufacturing production.
Read MoreRead Next
Video: What is the Manufacturing Demonstration Facility at Oak Ridge National Laboratory?
This industry-focused organization within the Department of Energy helps manufacturers make use of advanced technology, particularly 3D printing. One of the group’s leaders describes how companies work with the MDF.
Read More3D Printing Rotors for Electric Motors (Video)
Oak Ridge National Laboratory describes research into applying additive manufacturing to replace windings in DC motors.
Read More3D Printed Magnets: The Cool Parts Show #38
Is it possible to 3D print a magnet? In this episode of The Cool Parts Show, we learn how magnets have been printed successfully at Oak Ridge National Lab, and the implications this has for energy, material conservation and supply chains.
Read More
