Aerospace Contractor Brings Custom Tooling In-House with FDM 3D Printing
Adding an FDM 3D printer enabled a producer of subassemblies for aircraft to bypass traditional tooling solutions on many custom tools and bring much of this work in-house.
CPI Aerostructures was in a good position in 2013. After years as a small business providing subassemblies almost exclusively for military aircraft, the company was experiencing a massive growth spurt. Sparked by an influx of both commercial and military work, the company had grown from about 20 employees to nearly 300 in just a few years, and recently moved across the street from its original facility to a larger 171,000-square-foot space on New York’s Long Island.
But CPI’s ability to meet its custom tooling needs hadn’t kept pace with this growth. The company’s niche is assembly, work that requires jigs, fixtures, check gages and other custom items. Because CPI does not produce discrete parts, its in-house machining capacity is limited to a small tooling department operating manual equipment. Historically, all custom tooling was made by this department or farmed out to local machine shops.
Faced with ever-increasing demand for custom tooling on the assembly floor, the company had to make a choice: A) Continue to outsource this machining work, adding cost and lead time to projects; B) Add machining equipment and personnel to the tooling department, increasing capacity but also adding overhead; or C) Find another solution.
In the end, CPI chose option C: It added a fused-deposition modeling (FDM) 3D printer. Taking this route gave CPI the added capacity to bypass the traditional tooling department on many tools, bringing more of its tooling work in-house, and reducing the time and cost of creating custom tooling.
Sparked by Growth
Producing subassemblies for aircraft has been CPI Aerostructures’ specialty since the company was founded in 1980. Typically working as a subcontractor, CPI sources discrete parts from its global supply chain, fashions them into subassemblies, polishes and paints the assemblies as needed, and ships the finished pieces to the customer or main contractor.
Whereas many of its peers are vertically integrated—offering machining, metal forming and fabricating, assembly, and finishing services—CPI focuses almost entirely on assembly. For years, all of the custom tooling required for this work had to be farmed out to local machine shops.
"Basically, we were doing things the same way they'd been done since World War II,” says Clint Allnach, director of manufacturing operations. “We’d model the jigs and fixtures then send the design to external shops. Those shops would have to procure the material, machine it and deliver it. Typical lead time was anywhere from 12 to 14 weeks for a modest-sized tool and could cost several thousand dollars to $25,000 or more.”
The addition of an in-house tooling department in 2012 helped alleviate some of the company’s tooling needs as it grew. This department relies on manual equipment, including Bridgeport mills, lathes and welding equipment to manufacture and maintain metallic tools such as custom jigs, fixtures and gages. But by 2013 the maintenance and care of the hundreds of tools needed on the assembly floor became overwhelming, and CPI reached a point where another solution was necessary.
With the help of Stratasys reseller Cimquest, CPI purchased and installed a Fortus 360mc 3D printer. The FDM system offers a build envelope measuring 14 by 10 by 10 inches (355 by 254 by 254 mm) and enables CPI to print with both polycarbonate and nylon material.
Bringing the printer into the engineering department has dramatically reduced cost and turnaround time for custom tooling. In many cases, tooling can be printed in-house much more cheaply, usually for about 25 percent of the cost of outsourcing it to be machined. 3D printing is also much faster; by batching parts and running the printer overnight, CPI can have a complete tool in-hand in less than a week.
"What we transitioned to was still doing the modeling and design in-house, but short-circuiting the entire offload procedure and just batching all our design models to the printer,” says Allnach.
Looped into the Process
CPI is now able to print custom tooling, check gages, fixtures and other items for use on the assembly floor with FDM at a fraction of the cost of having them machined out of house. The printer has become so engrained in the company’s workflow that 3D-printed tooling is considered for every new job that comes in, and is often turned to as the solution for problems that arise.
For example, one challenge that comes with sourcing parts from external suppliers is ensuring that the parts received have been made to correct dimensions and tolerances. With lightweight and flexible aerospace parts, this can be especially difficult. One of the parts that CPI receives is a bonnet for an A10 Thunderbolt aircraft, a lightweight part that is so flexible the company couldn’t be sure it was built to specification before it began drilling the holes for assembly.
The solution? The engineering department 3D-printed a form that could be used to check the part before assembly began. The tool is too large to have been built in one piece inside the Fortus, so it was split into four parts which are pinned together. Now, it's a simple matter of clamping the flexible aluminum part to the form to check its shape before moving on to drill and assemble.
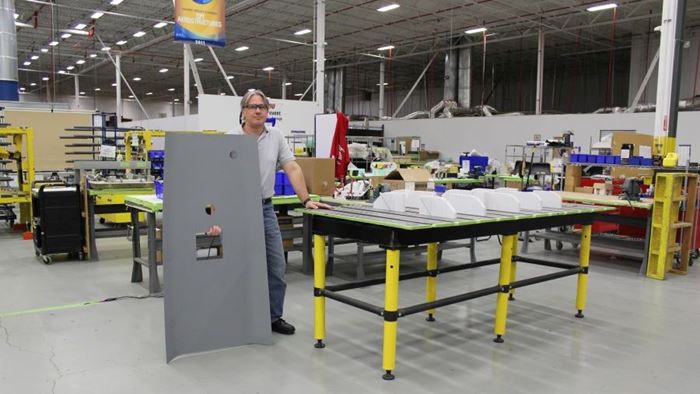
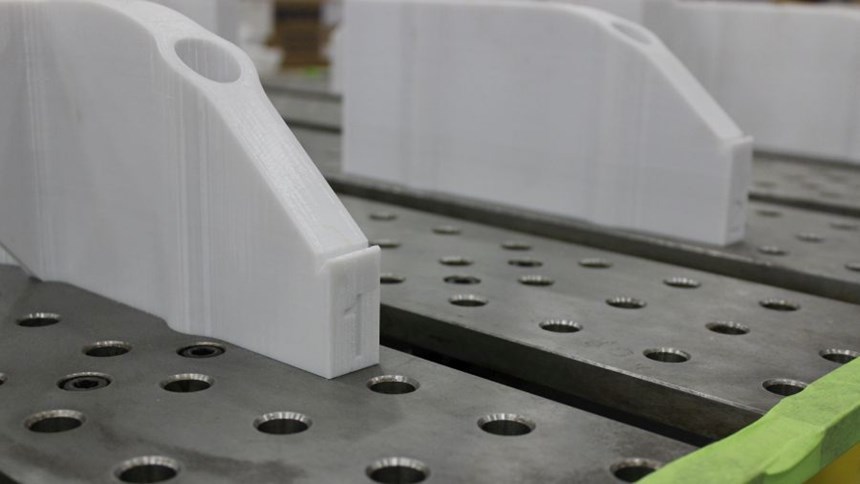
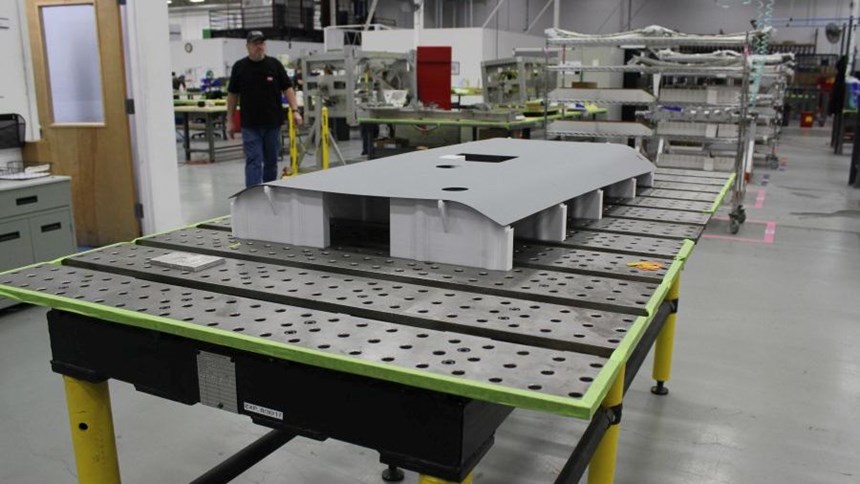
The company came up with a similar solution for a panel that serves as the floor of the cockpit in the Northrop T-38. This piece is much larger than the bonnet, however, and it would have been impractical to make a solid form. Instead, the engineering department 3D printed a series of numbered ribs to support the part. These fixtures were built with pins designed to fit into a precision welding table. Now, to check the panel, an employee simply sets up the ribs on the table and places the panel on top. From there, a portable CMM is used to check that the panel meets expected dimensions.
"Hybrid" Solutions
In both of the previous examples, CPI Aerostructures opted for 3D-printing as a direct replacement for machining. But Allnach is quick to point out that additive manufacturing is not always the solution to every problem, nor is it always the complete solution. In many cases, the shop uses what he calls "hybrid tooling," meaning tooling formed from a combination of printed and machined parts, each serving a specific function.
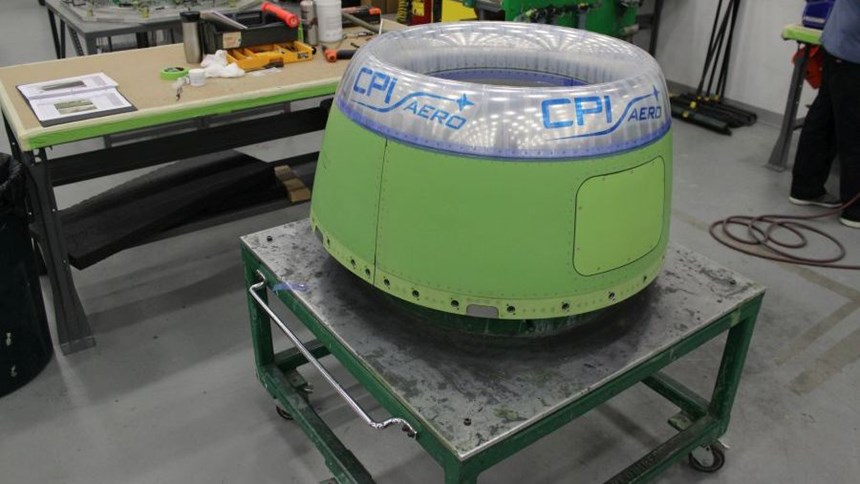
One example is a fixture for the engine inlet of an Embraer Phenom 300. The inlet requires a number of large holes to be drilled around its circumference, but the thin sheet metal of the part is liable to bend when subjected to the force of a drill.
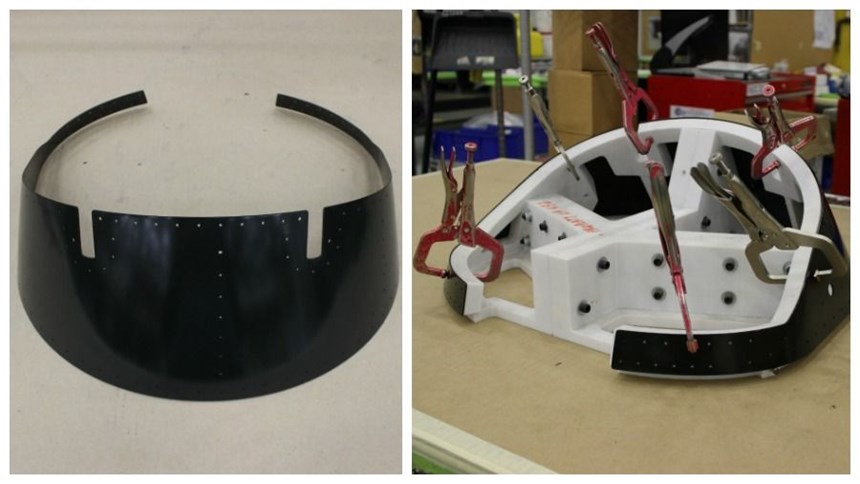
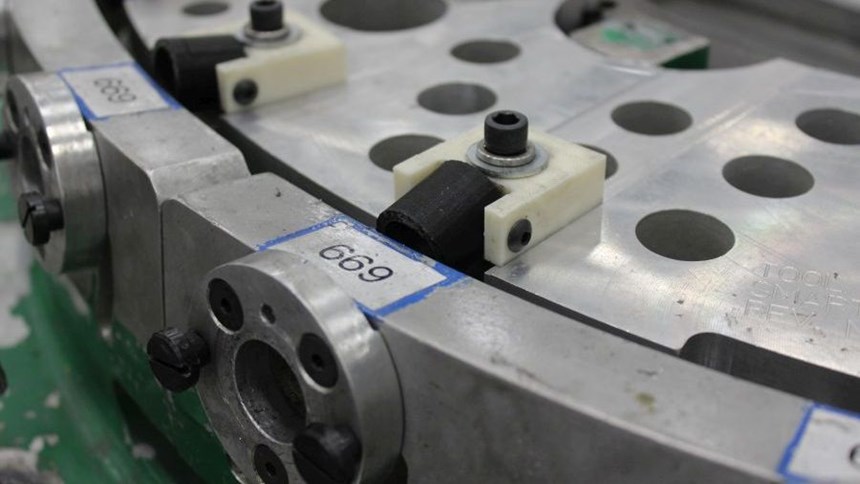
To hold the part in place and provide support during the drilling process, CPI developed a “hybrid” fixture consisting of a central machined aluminum ring, with printed ASA pads and nylon “cannons”—the black hollow cylinders visible in the photo above. When the part is seated in this fixture, the cannons are flush against its inner diameter where the holes will be drilled. The nylon is soft enough to hold the part in place without marring its surface, and, with the impact-resistant polycarbonate behind it, provides needed support during hole drilling. This hybrid solution could be made more quickly and at lower cost than machining the pads and cannons from steel and aluminum, respectively.
The 3D-printed tooling may not be as durable as metal parts, but that’s often no deterrent. The polycarbonate and nylon parts pictured in the hybrid fixture have been through about 70 cycles and are still going strong. Just like conventionally made tools, 3D-printed and hybrid tools are subject to periodic calibration and checks for wear and damage. But once the tools are no longer usable, it’s a simple matter to replace them. The engineering department can simply pull up the CAD file for the tool and print a new one. According to Allnach, even if the shop has to print a tool two or three times over its lifecycle, that’s still cheaper than having it machined and much faster to replace.
Rewiring for Additive
It wasn't easy to get to this point, Allnach notes. At first the engineering department’s inclination was to design parts, often solid, as if they were to be machined. Integrating standard hardware such as bushings and pins into the plastic tooling was also a challenge, and there were problems with cracking in the beginning. Fixing these problems required thinking differently about tooling destined for 3D printing.
“Additive manufacturing thinking is the inverse of subtractive,” says Allnach. “With machining, the more material you remove, the more expensive the part becomes. But with additive, you gain value by leaving out as much material as possible.”
With training provided by Cimquest and ongoing trial and error, the company has learned to use the technology effectively and has even established a set of 3D-printing design guidelines. These guidelines address issues ranging from selecting the ideal print orientation to managing bed space. Having this set of rules and suggestions helps streamline the design process and improve the rate of printing success.
Given the positive impact that CPI has seen over the past few years, the company is now ready to upgrade its 3D printer. Working again with Cimquest, CPI has found a buyer for its Fortus 360mc and made plans to purchase a used 400 model. This new machine will offer an expanded build size and also add the capability to print in Ultem, which will further extend the lifespan of custom tooling. It's even possible that the company would one day use this capacity to print structural parts for aircraft, but that's still a long way off.
3D printing capability is not necessarily something the company markets to its customers, but those who know about it see its value, says Allnach. “We can now help with prototyping work, and it makes us much more flexible in terms of accommodating changes to designs,” he says. The 3D printer is also a “risk mitigator.” It allows CPI employees to be creative in coming up with solutions, and customers have more confidence in CPI’s overall process knowing that tooling can be easily iterated to accommodate design changes.
Related Content
3D Printed Titanium Replaces Aluminum for Unmanned Aircraft Wing Splice: The Cool Parts Show #72
Rapid Plasma Deposition produces the near-net-shape preform for a newly designed wing splice for remotely piloted aircraft from General Atomics. The Cool Parts Show visits Norsk Titanium, where this part is made.
Read MoreWhy AM Leads to Internal Production for Collins Aerospace (Includes Video)
A new Charlotte-area center will provide additive manufacturing expertise and production capacity for Collins business units based across the country, allowing the company to guard proprietary design and process details that are often part of AM.
Read More3D Printed Lattice for Mars Sample Return Crash Landing: The Cool Parts Show Bonus
NASA Jet Propulsion Laboratory employs laser powder bed fusion additive manufacturing plus chemical etching to create strong, lightweight lattice structures optimized to protect rock samples from Mars during their violent arrival on earth.
Read MoreHow Norsk Titanium Is Scaling Up AM Production — and Employment — in New York State
New opportunities for part production via the company’s forging-like additive process are coming from the aerospace industry as well as a different sector, the semiconductor industry.
Read MoreRead Next
Profilometry-Based Indentation Plastometry (PIP) as an Alternative to Standard Tensile Testing
UK-based Plastometrex offers a benchtop testing device utilizing PIP to quickly and easily analyze the yield strength, tensile strength and uniform elongation of samples and even printed parts. The solution is particularly useful for additive manufacturing.
Read More3D Printed Polymer EOAT Increases Safety of Cobots
Contract manufacturer Anubis 3D applies polymer 3D printing processes to manufacture cobot tooling that is lightweight, smooth and safer for human interaction.
Read MorePostprocessing Steps and Costs for Metal 3D Printing
When your metal part is done 3D printing, you just pull it out of the machine and start using it, right? Not exactly.
Read More
.jpg;width=70;height=70;mode=crop)
