DMLS or Polyjet? A Hands-On Comparison to Produce Prototype Mold Inserts
The development phase of creating injection molded parts and inserts often requires the production of small-quantity prototypes. This moldmaker compared two different AM technologies to produce prototype mold inserts made from tool steel and polypropylene photopolymer.
With prototype mold tooling, Lüttgens knows that the customer's main concern is getting a quality part in hand quickly. The Germany-based company manufactures injection-molded parts and thermoplastic components, including moldmaking and concept development services.
When customers required prototype molds or prototype injection-molded parts in the past, it took the company about four to six weeks to develop, machine and manufacture the prototype mold to produce the part. As a result, Lüttgens started to investigate different additive manufacturing (AM) techniques for rapid tooling to reduce the lead times for complete prototype molds to one week.
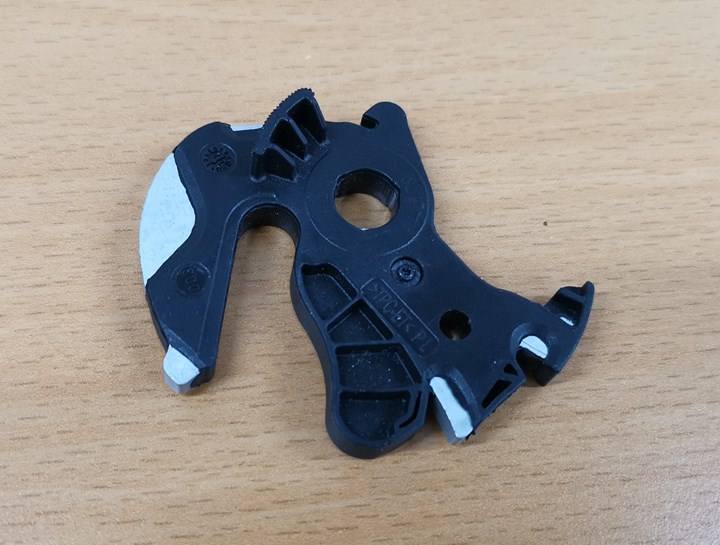
Lüttgens produced rapid prototype mold inserts for this injection-molded rotary latch used in the automotive industry. The latch is made from a thermoplastic copolyester elastomer (Hytrel 5526) with a minimum wall thickness of 0.8 mm.
The company decided to compare metal powder bed fusion to Polyjet technology, also referred to as fine layer technique, which applies layers of liquid photopolymer from a print head and cures the material with UV light. The test part was a mold insert for a rotary latch used in the automotive industry (pictured above). The original mold is made of hardened steel with a shot weight of 4.5 g. The material is a thermoplastic copolyester elastomer (Hytrel 5526) with a minimum wall thickness of 0.8 mm.
Metal Powder Bed Fusion
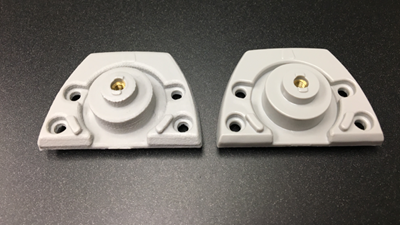
The metal prototype inserts were made from 1.2709 tool steel on an EOS M280 Direct Metal Laser Sintering (DMLS) machine. Since the process is quite an expensive one in terms of build time and raw material, Lüttgens uses a hybrid design and only 3D prints the necessary insert geometries. The mold plate is conventionally machined including cooling channels and counter bore for ejector pins and additional screws.
The AM part design includes offsets of 0.2 mm in the alignment area as well as in the ejector pin bores for postprocessing of the 3D printed surface. The build process takes 9 hours and the sintered part is ready for further machining. The alignment area and bores are milled or can optionally be eroded to obtain the required surface quality and tolerance of ±0.1 mm.
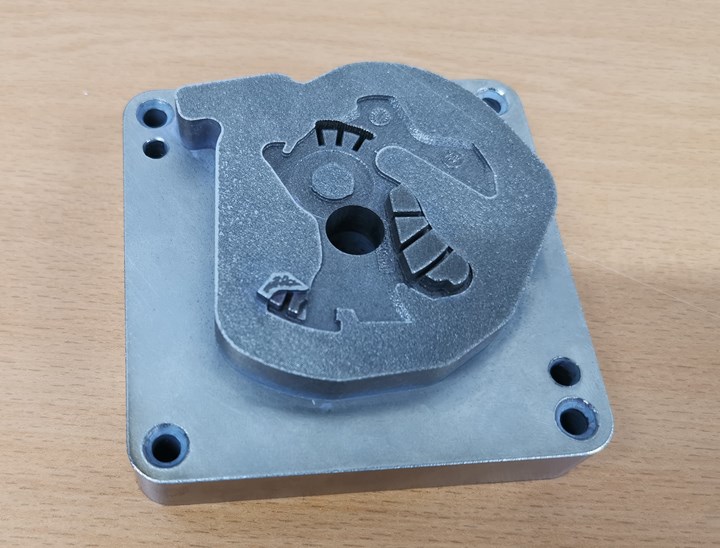
The metal prototype inserts were made from 1.2709 tool steel on an EOS M280 Direct Metal Laser Sintering (DMLS) machine.
For inspection, Lüttgens measured the part with a GOM optical measuring system, and the generated 3D model was used to compare nominal and actual values. A best-fit function is used to overlay the 3D model and CAD data sets in any position in free space to calculate deviations. According to Lüttgens, the dimensions of the printed mold are accurate according to the given tolerance of ±0.05 mm. The vertical surfaces exhibit a good surface finish due to the fine layers (between 20 and 50 microns).
For Lüttgens, the advantages of DMLS include minimum wear, high tool life, good mold temperature control through integrated cooling channels, and the ability to weld and harden the material. Disadvantages are higher cost and poor surface finish which reduces demoldability properties.
Polyjet
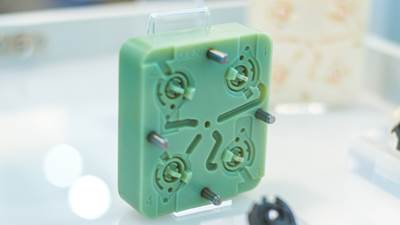
The Polyjet prototype inserts were made from Rigur (RGD450) plastic on an Objet30Pro machine from Stratasys. Rigur is an advanced simulated polypropylene and offers durability and a smooth finish. The material is used to 3D print precision prototypes that look and behave like polypropylene. The layer thicknesses are extremely fine at 14 or 27 microns. This allows components with a high dimensional accuracy of ±0.1% to be manufactured. The print process for this mold takes 9 hours, the same as with direct metal laser sintering.
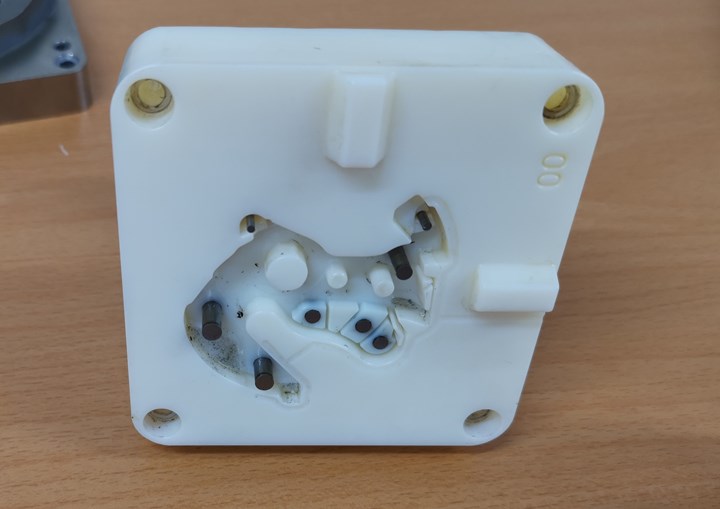
Mold inserts made from Rigur only last for about 10 shots due to the material's high wear properties. Lüttgens integrated steel bushes in the injection pin bores and in the core, but the additional integration of steel parts is expensive and makes the advantages of AM obsolete.
The part design is similar to the DMLS insert; offsets are the same in the alignment area and in the ejector pin bores for postprocessing (milling), and all contours and shapes are integrated but without cooling channels. Due to this design change and the material properties (low thermal conductivity of 0.2 W/m²K), temperature control during injection molding is difficult, Lüttgens says. Heat cannot be dissipated easily, with the effect that the injection molding material takes a very long time to cool down and mold open times need to be longer. Cooling can be supported using ice spray; however, a continuous production process is not possible to realize.
Moreover, Lüttgens found that the inserts made from Rigur only last for about 10 shots due to the material's lower wear resistance. According to Lüttgens, it is possible to integrate steel bushes in the injection pin bores or in the core, but the additional integration of steel parts is expensive and makes the advantages of AM obsolete.
In terms of accuracy, Polyjet reaches a more precise mold surface reproduction than DMLS, Lüttgens found. There are smooth transitions in the vertical and horizontal surfaces, and printing with liquid material avoids step formation. The material costs are low, but it possesses plastic ductility with a risk of undercut formation.
Results
Both 3D printing technologies, Polyjet and DMLS proved to be suitable to build rapid molds within one week, including CAD design (10 hours) and work hours (10 hours). However, the material costs used for direct metal laser melting are twice as high as the RGD450 used in Polyjet printing, and standard parts necessary to build the molds as well as the printer costs are around four times higher with DMLS. Still, Lüttgens prefers to build itsrapid molds via DMLS as the tool life is much higher with more than 500 shots compared to 5 to 10 shots with Polyjet printing due to the material's wear properties.
Related Content
Lightning Round — Recent Popular AM Topics: AM Radio #44
Sporting goods, tooling, multiple materials — in this episode of AM Radio, Jodee McElfresh and Peter Zelinski discuss the topics that have been popular on the Additive Manufacturing Media website and social media recently.
Read More3D Printing Molds With Metal Paste: The Mantle Process Explained (Video)
Metal paste is the starting point for a process using 3D printing, CNC shaping and sintering to deliver precise H13 or P20 steel tooling for plastics injection molding. Peter Zelinski talks through the steps of the process in this video filmed with Mantle equipment.
Read MoreCombining Metal and Polymer for Better 3D Printed Tools
Applications prone to wear call for more durable tooling than 3D printed polymer alone, but full metal is not always necessary.
Read MoreVideo: Mold Base for Product Development With 3D Printed Molds
Alba Enterprises created a mold base to match the needs and pacing of product iteration using mold tooling made via additive manufacturing
Read MoreRead Next
PolyJet Process Speeds Injection Mold Prototyping
By 3D printing prototype mold tools, German moldmaker Hans Geiger Spritzgießtechnik reduced both the time and money required to produce them.
Read More3D-Printed Prototype Molds Versus Aluminum Tooling
An in-progress case study by Phoenix Proto Technologies aims to answer questions about what is—and isn’t—possible with 3D-printed molds.
Read MoreWhat A Former Moldmaker Has Learned About AM: Leverage Simplicity and Let It Scale
The once-again independent Linear AMS is now more focused on additive manufacturing than ever before.
Read More


